
 The central heating boiler has been clanking rather alarmingly lately and I seem to have spent the entire day waiting while the world passed me by. Why is it, service engineers and delivery companies never give specific times?
Anyway, in the end, I settled down to sewing the nose I told you about yesterday and yes, I did remember to take photos as I worked so now you can see my new bear start to come to life!
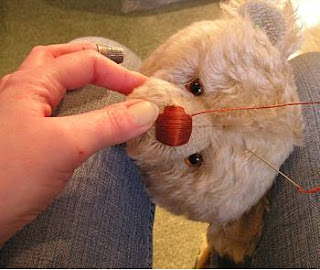
I know it looks painful, but the long needle is an essential part of the process. I like to work with the head gripped between my knees, I don't know how other bear makers sew their noses, but this position works for me.
 I use a traditional block design for nose embroidery and prefer to work straight onto the mohair without a template. This bear's nose is going to be a lovely rusty colour. Starting in the centre of the muzzle, I work first out to the left of the bear's nose in satin stitch, watching carefully where my needle is exiting each time, so that all the stitches are neatly aligned. There is a knack to sewing a good nose and it relies heavily on tensioning the thread equally for each stitch and ensuring all the stitches are the same length.
 When I've finished the left side, I return my needle to the centre and repeat the process for the right side of the nose. This gives me a base layer of embroidery to work over. I can now see what size of finished nose will suit my bear before I complete my embroidery. By the way, a good stout thimble is essential to protect the end of your finger when stitching!
As you can see, his nose is beginning to take shape, but at this point, it's not really doing him justice. There's more work to be done if he's to have a nose to be proud of!
 So, the next step will be to repeat the process, but this time, ensuring the finished nose is exactly the right size and shape to suit my bear.
Here we go again! Back into the centre of the muzzle, out to the left first, then to the right. This time my stitching exits slightly higher on the muzzle so that the nose will be the final size necessary to give him that all important bearsonality!
Can you see it taking shape now? I use my thumb to tension each stitch as I sew, so this is far from a speedy process, but definitely worth taking a little time and care over. If I add a couple of finishing stitches horizontally across the top and bottom of the nose and we're almost there...

Two little stitches down the centre seam of the muzzle and this fella is all ready for his mouth to be stitched in a traditional inverted 'V' shape ...

And voila! Here he is!
Hey, hello Freddie ... he looks like a Freddie to me, does he to you?
So my new bear's head is now made and you've been the first to meet him, but he needs a body, arms and legs before he really comes to life and of course, please don't let me forget to sew his ears on ...

What a darling little bear face. It was fun to watch it come alive:o)
ReplyDeleteFreddie is a totally handsome bear - like all your bears Paula -it's a treat to witness his nose in progress and then to see the final face, thank you so much for a fabulous blog
ReplyDeleteThank you both for stopping by - the pictures took quite a while to sort out in the blog template, so your comments have made me feel it was definitely worth the effort! I'm glad you enjoyed them.
ReplyDeleteThanks for the wonderful guide to sewing on a new nose!! I have to repair my son's "Ted-Ted" for his daughter, arriving early September!!
ReplyDeleteThank you very much for these tips. After 20 years I want to start making bears again.
ReplyDeleteI wish my noses were so neat, still , I keep trying. Your bear is gorgeous.
ReplyDelete