Saturday, 27 February 2010

Finishing Touches!

So here we are, the day before show day!  The final ear has been attached and everyone photographed, so all that is left for me to do is finalise price tags, hangtags, carrier bags and generally organise myself before thinking about packing up my trusty Saxo early tomorrow morning.  Unfortunately Sunday's weather forecast isn't good - heavy rain and gale force winds are predicted, so  I'm praying our show collectors will be a hardy bunch, prepared to battle the elements for their special show bears!

20" Elwyn

I'm relieved to tell you I finished my 'just one more' bear yesterday evening.  After making all the careworn, scruffy bears, I couldn't resist the temptation to create a lovely new looking, pristine white, fluffy bear -  I dare say he will stick out like a sore thumb on my table against the ramshackle rest, but never mind!

Careworn Collection hangtag

I had one of my last minute lightbulb moments a few days ago and decided I needed to design new hangtags and postcards for the show bears.  Typically I didn't leave myself enough time to take advantage of reasonable delivery charges, so paid a small fortune to make sure they arrived in the nick of time, but at least they did arrive and the bears will be able to show them off properly at the Winter Bearfest tomorrow! 

 Careworn Collection promotional postcard

If you would like to visit the 'Winter Bearfest' tomorrow, please come along to Kensington Town Hall, Hornton Street, London SW8.  The doors open at 10.30am and the day will be filled from start to finish with thousands of the most wonderful teddy bears, all hoping to find new homes!

Thursday, 25 February 2010

Kingsley is coming to Hugglets!

Just popping in to show you my final bear for the 'Careworn Collection' before I run back to my workroom to finish my 'just one more' show bear!

15" Kingsley will debut at the Winter Bearfest
on Sunday 28th Feb!

I have really enjoyed creating my collection of weary, scruffy ol' bears, but I'm now feeling the urge to make a lovely big, fluffy white, pristine, twinkly eyed ted.  Watch this space ... hopefully he'll be ready in time for Sunday!

Monday, 22 February 2010

Bears with a tale to tell ...

I have just one more working week to finish my show bears!  As always, the time is flying by so quickly I'm wondering if I'll ever be ready ...

19" 'Blyton' will debut at the Winter Bearfest show next Sunday.

Last week I managed to finish two more lovely bears for the show, 'Blyton' is a truly scruffy careworn ol' bear, completely mischievous and adventurous, rather like one of the characters in his namesake's 'Famous Five' books!  How I used to love those books when I was a young girl! 

19" Kipling will be there too!

His pal 'Kipling' is a gorgeous slumpy bear and the two of them together look absolutely adorable sat telling tales on the back of my sofa at the moment - I will miss them when they find new homes!


If you would like to meet the bears in person, please come along to the show on Sunday ... we'll be on Stand 63 in Hall 2 at Kensington Town Hall in London SW8.  Doors open at 10.30am!

Monday, 15 February 2010

Countdown to the 'Winter Bearfest'.

From time to time, a collector makes a special request to name their own bear, which is that's how 'Kevin' came into being!  I'm sure Kevin's owner won't mind me sharing him here with you, he's such a handsome fellow!

20" 'Kevin', a special commission

Kevin is now living in Cumbria with his new family and I'm busy trying to finish the final few bears for the Winter Bearfest Show in London on the 28th February.  There are only two more working weeks until the big day, so I'm sorry, but I must keep my blog posts brief! 

Before I return to my sewing machine, here's a quick pic of my first four completed show bears ... I hope you enjoy my new 'Careworn Collection'!

'The Careworn Collection' will debut at the 'Winter Bearfest' on February 28th. 
Please see www.hugglets.co.uk for further details.

Friday, 12 February 2010

People's Choice Nomination for Caspian!

I should have mentioned this on my birthday, but I was so overwhelmed with birthday celebrations I completely forgot to tell you about Caspian receiving a nomination in the People's Choice Awards!  As you can imagine, this was an extra special birthday treat for me!

'Caspian', finalist in the 2010 'People's Choice Awards'

This competition is judged by public vote and there are some lovely entries, so please spare a moment to support everyone's work by casting your vote at:


Thank you!

8th March 2010 update:  Many, many thanks to everyone who voted for Caspian in the People's Choice Awards and congratulations to Lorraine Almond of Almond Bears for winning the 'Bears 6" and over' category, as well as the overall 'People's Choice' Award! 

Happy Valentine's Day!

It's Valentine's Day on Sunday, so I can't resist sharing this 1911 Valentine postcard with you - it's not exactly my idea of romantic though!

I had fun making a special Valentine's Prim Dolly Doodle this week, she's called 'Valentina' ... cute eh?!

20" Valentina

Wishing you all a wonderful Valentine's weekend!

Wednesday, 10 February 2010

Beatrix to the Winter Bearfest!

I finished Beatrix yesterday - as usual I'm in a race against time to prepare for one of the most important London shows of the year and am fast running out of time! I'm really pleased with this little lady though (not really little at 19 inches!) ... I do hope you like her too!

19" Beatrix

Beatrix will be making her debut at the show on February 28th, to be held in Kensington Town Hall, London, SW8.  Please visit www.hugglets.co.uk for full details.

Monday, 8 February 2010

Hugs and kisses ...


I enjoyed a lovely birthday last week and was surprised by many warm birthday wishes ... a big thank you to everyone who came to visit, or sent me a card, or a message to share my special day with me.  Very special thanks to my nieces, Leah, Lauren, Sian and little Erin, for coming to visit their Auntie Paula! 


Happy Birthday too, to my youngest sister Laura.  Her birthday is only two days after mine, so one way and another, we've spent quite a bit of time catching up with our family and nattering over cups of coffee and birthday cookies this weekend!

Me and Laura (and Big Ted!) back in 1977

And now of course, Valentine's Day is almost upon us!  I had hoped to have my Prim Dolly Doodle ready in time for a little romance, but at the moment, I'm not sure if she'll be finished in time ... fingers crossed I can find a few hours before Sunday, so she can put on her best frock and join in the fun!

Valentine's Prim Dolly Doodle in progress ...
but will she be ready in time for the big day?

I absolutely must finish the bear I'm working on today, so am going to dash up to my workroom now.  I hope you all enjoy your week and find time for those all important hugs and kisses on Sunday!

Thursday, 4 February 2010

Daft Dollies in print!

I am so thrilled!  I have just discovered the US 'Teddy Bear Review' magazine has published my Witchypoo dolls and 'Little Boo' bear, as part of their 'A Bear and a Doll' feature.  This is the very first time I've had my daft dollies published, so as you can imagine, I am absolutely delighted!

'The Witchypoos'

'Little Boo'

If you would like to purchase a copy of the magazine, it is available from:


By the way, it's also available as an imag download, which is great for overseas readers!

Monday, 1 February 2010

In the wars ...

It's been a chilly weekend here in Kent, despite the welcome sunshine.  Stuart went with his Dad to watch the Gills play football on Saturday afternoon, so I bundled myself into my cosy workroom to take advantage of a little extra bear time.  After all, if I don't organise myself pretty smartly, I won't have any bears for the Kensington show on the 28th Feb and that is an unthinkable thought! 

19" 'Nesbit' will debut at the 'Winter Bearfest' on 28th February.

Fortunately I also squeezed some spare time on Sunday afternoon to work on my new bear and managed to finish him.  I photographed him this morning and here he is!  Poor old fellow looks as though he's been in the wars don't you think?! 

I'm really enjoying creating these vintage style bears ... they are so endearing!

Friday, 29 January 2010

Here we go again ...

It's Friday already!  Can you believe it?  Where did the week go?!  I've had my nose to the grindstone working on this big guy for a collector ...

22" 'Cassius', a special order for a collector

... and somehow the weekend crept up on me while I wasn't looking!  So that must mean there are only four more weeks until the 'Winter Bearfest' show in London on the 28th February and I still have another commission order to fulfil yet!  I'd better get myself a bit better organised so that I can start work on my show bears in earnest.  Fortunately I have my second show bear sewn up and ready to stuff and some new fabrics on their way to me in the post ... 

... hey ho, it's showtime, so Paula has no time!  
Oh dear, here we go again, it must be time to panic!

Thursday, 28 January 2010

Something old ...

I've had a bee in my bonnet for a while ... something about adding a more nostalgia quality to my bears has been buzzing around in my head.  So, I popped into the Guild of Master Bearcrafters a couple of weeks ago and asked my bear artist friends if they could help point me in the right direction.  They were so generous and enthusiastic with their advice!  We quickly began chatting about this aspect of our craft and before we knew it, had created an impromptu online workshop! 

Victorian/Edwardian boot buttons - perfect for vintage style teddy eyes

I would especially like to thank Barbara Spiga of Bobby Baer in France and Vicki Allum of Humble Crumble Bears here in the UK, for sharing their thoughts and advice.  Both ladies are expert at creating fabulous antique style bears, each with a very individual style, so do please take a peek at their work, I know you'll enjoy your visit! 


'O Best Beloved'

And this is the bear I created as a result of my impromptu workshop with Vicki and Barbara!  He's 19" tall and as you can see, I have developed some 'vintage' styling techniques, including distressing his mohair to give him a careworn, nostalgic flavour.  'O Best Beloved' will make his debut at the 'Winter Bearfest' show in Kensington Town Hall on 28th February.

Creating Heirloom Teddy Bears by Linda Mullins

By the way, if you are interested in creating classic teddy bears you might enjoy  'Creating Heirloom Teddy Bears' Published in 1995 by Hobby Horse Press.  It is the first of two such books written by Linda. It really is a lovely book and Linda's passion for vintage bears shines through the pages. Each pattern has been carefully re-created from Linda's original collection of beautiful antique bears by Flore Emory, an expert at recreating early bear designs. The book offers an insight into nine special bears, from America, the UK and Germany.

Tuesday, 26 January 2010

Mary-Mary, quite contrary, how does your garden grow?

So what does a man in his mid-forties give to his Mum on her birthday?  In Stuart's case, a raggy doll!  Yes, I have been commissioned 'by he who must be obeyed' (some hope!) to create a special dolly, for a very special lady.  It wasn't difficult to decide on a theme as this particular lady is completely green-fingered and loves gardening. 

'Mary-Mary'

Fortunately for me, she doesn't have a computer, so I can safely share a little peek here, before 'Mary-Mary' slips into a birthday gift bag!

Wednesday, 20 January 2010

Solomon to Singapore

In my haste to tell you about the Hugglets show at the end of February, I almost forgot to give my new bear 'Solomon' his moment of fame!  I created him last week as a special order for a collector in Singapore and he's flying there as we speak; I do hope he arrives soon!


20" Solomon is relocating to Singapore!

I have an order for a different collector to complete this week and coincidentally, that bear is destined for Singapore too - I wonder if he and Solomon will be neighbours?!

Tuesday, 19 January 2010

Putting it into practice ...

I've had such fun this week!  I've been busily working on a new design and teaching myself some new bear-crafting skills (yes, even after fifteen years creating bears, there is still much to learn!)  With 'The Winter Bearfest' just around the corner, I really would like to have a new style of bear to offer, so I've been listening to some great advice offered by some of my talented bear artist friends and putting their generous wisdom into practice. 

Although I can't share very much more with you here today, I can tell you I'm very happy with my first bear created in this style!

'The Winter Bearfest' will take place on the 28th February in Kensington Town Hall.  I'd love to see you there!  Please visit http://www.hugglets.co.uk/ for full details.

Friday, 15 January 2010

Tutorial: inserting a simple head gusset and stuffing your bear's head.

COPYRIGHT:  Please respect my copyright. My tutorials are provided for general interest only and are not offered for general distribution, copying, or sharing in any way, without my express permission.

The problems of wonky noses and uneven eyes can often be improved by going right back to basics and looking at how a bear's head is stitched together. This  basic tutorial is for a classic three piece head design, but I think would be relevant for most head patterns.

First a word about the head gusset pattern piece: it must be symmetrical. My method for achieving a symmetrical head gusset pattern piece is simply to draw my pattern onto folded paper and cut it out, paper still folded, before transferring it to card.


For the purpose of this tutorial, I am assuming you have already stitched your two side head pieces (furry sides together) from sewn nose tip to neck opening and neatly clipped the seam diagonally at the nose tip to remove fabric bulk.

Secondly, an important thing to consider before marking the head gusset pattern piece onto your chosen fabric, is the weave of the backing fabric. If you look closely at the fabric backing you will see how the backing threads are woven together horizontally and vertically. Take particular note of the weft (horizontal threads) when placing your head gusset prior to marking out. Try not to be too swayed by the way the pile lays on the face of the fabric ... pile direction can be changed with a little post-head making styling if necessary. So, I recommend placing the nose tip carefully across the horizontal threads, ensuring it is level with the threads; this will help greatly when it comes to sewing your perfect nose! (That subject is another tutorial!)

Finally, a little tip: cut your head gusset slightly longer than needed at the back head end - all will become clear in a moment!

Okay, let's get started:

As with my footpads (see 'Perfect paw pads' tutorial) I like to mark out my sewing seam at the nose end of the head gusset. I do this prior to cutting out the fabric. If you wanted to, to ensure even seams and therefore a perfect shaped head, you could mark out your seam allowance around the entire head gusset.

WORD OF ADVICE:  When marking your seam allowance on the reverse side of the fabric be careful with your choice of marker - I find a sharp lead pencil is best for this job because it won't bleed through the fabric into your bear's muzzle at a later date.

1. Fold the head gusset in half to find the centre of the nose area. Mark the centre with a dressmaker's pin, taking care to be exact, then take your side head pieces (chin seam already sewn) and pin straight through the very centre of the chin seam.


2. Following the line of your pre-drawn muzzle seam and using dressmakers' pins, secure the muzzle area in place by pinning vertically through the gusset into the relevant side head piece - take care to match your pins on opposite sides of the head gusset and around the muzzle area.

3. Because I prefer to leave most of my pins in whilst sewing the head gusset into place, at this point I pin the rest of the head gusset in place using small metal pins pinned horizontally (I think these are called household pins) - usually it's possible to sew past these little pins without damaging your machine needle.


TIP:  If you have cut your head gusset longer than necessary, when you have finished pinning the leftover fabric at the neck (back) end of your head should be even, not lopsided ... if it's lopsided I'm sorry but you'll need to un-pin and start again because your head gusset fabric won't be distributed evenly and this will cause your bear's head to be mishapen when stuffed. If your leftover fabric is even - great! Simply snip across to remove the excess fabric.

4.  Baste (oversew) around the muzzle area, removing dressmaker's pins as you go. Tip: You may find it helpful to secure the centre of the muzzle/chin together with a couple of firm stitches first - it may also help you to secure a small stitch at both of the muzzle indents, (the area before the shaping raise and curves to create the head/brow shaping) prior to basting around the rest of the muzzle.
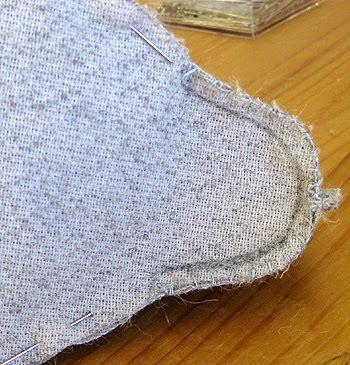


5.  Starting at the back of the neck, sew your gusset into place - I prefer to machine stitch for a neat finish. Take care to sew along your pre-drawn muzzle seam line, moving the machine foot very slowly around the curves.

TIP:  I always machine stitch my seams twice for strength ... popping a seam when stuffing is no fun! Note: It's very important to ensure you achieve an equal seam allowance on both sides of the head if you want your head to be symmetrical when stuffed (this will help considerably when you come to positioning your bear's ears!)


6.  Now you are ready to remove the little pins and turn your completed head furry side out to begin begin stuffing! First though, check you have eased all the seams out fully ... particularly in the muzzle area (if necessary, use a chopstick or similar blunt tool inside the head to gently ease out the corners paying particular attention to the nose area)- it's best not to rely on the stuffing to push the seams out for you.


7.  Stuffing a bear's head can be tricky! For the purposes of this tutorial,  I am using a non-slip polyester filler.

STUFFING TECHNIQUE:  I prefer to start with the nose end and a smallish stuffing tool (I use the Barbara Willis doll makers' medium sized stuffing tool for this; please remember I'm a maker of big bears so I would say the tools I mention are especially suitable for bears over 10"... my BW stuffing tool comfortably stuffs a 20" bear head for example. The BW stuffing tool is strong and has a tiny head which really grabs the filler well to position it. I have found it much easier to use for head stuffing than my traditional bear stuffing tool ... but it does take a little more patience to fill a head! You will no doubt already have found suitable tools to accommodate the size of bear you are making, but if you'd like to try this BW stuffing tool for your very little bears, it is also available to purchase from www.joggles.com in a small size).

Taking small pieces of a firm, non-slippery polyester filler (something nice and 'crunchy' works well) and tugging at the filler to separate it so it doesn't 'ball', I ease it into the muzzle/nose area and when I have a few pieces in place, I give them a few firm prods with my stuffing tool to encourage them into place. Once the muzzle area is fairly well filled and reasonably firm, I add larger pieces of filler to the main head area ... I do this fairly symmetrically, so if I add filler to the left of the head, I will then add to the right side and so on ...

Once the filler is positioned moreorless around the wall of the head, I add filler to the centre of the head, pushing it into place with my fingers and then my stuffing stick until it feels firm but not like rock. During this process I am also continually encouraging more small pieces of stuffing into the muzzle area, checking my centre chin seam all the while I am working and 'moulding' the head from outside from time to time. I also run my hands over the seams on the outside of the bear's head frequently to make sure they are filled with filler and not lumpy. It's all a bit of an instinctive process, difficult to put into words, but if you think of yourself as a sculptor, rather than as a stuffer (!) and continually check your bear's head, holding it at eye level to ensure you are filling the cavity evenly and feeling your work from the outside, you should eventually achieve great shape.

TIP:  If your stuffing feels overly hard and lumpy, don't keep stuffing in the hope things will improve, they rarely do! Remove and begin again, your bear's head is probably the most important element of your bear ... take your time to create a beauty!

There is a school of bear crafting thought that says bear heads should be rock hard - I'm afraid I disagree with this as I think they are better firm, rather than rock like ... it's personal preference of course, but my reasoning is that I prefer to work with my fabric, rather than battle against it and whilst generally strong, mohair was not designed to be impenetrable! A good quality mohair will cope well with firm stuffing, but may split with force.  A firmly stuffed head allows scope for needlesculpting and will accept indented eyes, it will also provide a solid foundation for nose embroidery. A rock hard bear's head may prove an unnecessarily difficult challenge!

Once my bear's head is stuffed, I sit a hardboard disc and cotter pin joint in his neck cavity (I like to make my bears the traditional way with gathered neck and cotter pin joint) and run a couple of rows of running stitch around the base of the head to gather the base of the head together in preparation for assembling him later. There are several methods of closing your bear's head and as I say, this is just one of them. I then trim away a little of the fur from his nose area checking to ensure the chin seam is dead central, pin on his ears and use dressmaking pins to determine where I would like to place his eyes and nose embroidery.

Voila, he is now ready for muzzle trimming!

This is my bear below, with his head gusset sewn in, stuffing completed, dressmaking pins to denote eye placement (see 'tips' link below) for eye insertion tutorial), muzzle trimmed and nose/mouth sewn.  (There is also a nose embroidery tutorial included in the link below)


FINAL TIP OF THE DAY:  Try sewing your bear's nose before placing his eyes ... I think it makes it easier to tell if his eyes will be level.

If you would like to learn a little more about bear crafting, please visit my 'tips' page for further tutorials: http://allbear.blogspot.com/search/label/tips

Monday, 11 January 2010

Snowscape

I am very happy to tell you Edward Dear found a lovely new home immediately he was announced as hopeful!  So now he's sitting on my shelf waiting for the snow and ice to melt a little so we can make our way to the Post Office in the car.  Did I mention it had snowed again here in the UK?  My goodness and how it has snowed!  We're so unprepared for the white stuff, it causes havoc on our roads.  According to the news reports we haven't seen snow like this in the UK for almost half a century ...


By 4.30 in the afternoon last Wednesday the road where I live was like a scene from Narnia!

The falling snowflakes were beautiful ...

... and the snow covered trees looked fabulous against the night sky!

Since then, it seems the entire country has been swathed in a blanket of snow.


On Thursday afternoon I took a walk with Stuart to photograph our little corner of Allington ...

The snow covered fields were stunning ...

We could only just see the farmer's sheep against their snowy field!

We walked along the lane ...

Past fields and woodland ...

... and just enjoyed the fresh air and snowscape!

That was several days ago and pretty as it all still is, I'd love a thaw and some sunshine now please!

Friday, 8 January 2010

Should auld acquaintance be forgot ...

Taking my cue from the sentiment in Rabbie Burns 'Auld Lang Syne' poem of 1788, I decided it would be right and proper that my first bear of 2010 should be a traditional bear, right down to his name.  So, please meet 'Edward Dear', a fond tribute to our wonderfully classic golden childhood bears ...


19" 'Edward Dear', my first bear of 2010

There's plenty of time ahead this year for more contemporary work, but for now, let's celebrate all that we first fell head over heels in love with!

Wednesday, 6 January 2010

Oh Snow!

Oh no, here we go again ...


This was the view from my bedroom window first thing this morning.  I don't mean to be ungrateful, but I'm longing for some green grass and sunshine ... banish the snow and bring on some daffodils please!  Ah well, at least the snow will ensure my first bear of 2010 can be stuffed today because I'm staying indoors - come what may!  Brrrrr!!!!!

Tuesday, 5 January 2010

Winter Wishes in 2010

Introducing Winter Wishes, my first 2010 Prim Dolly Doodle! 


'Winter Wishes'

She was such fun to make, but photographing her was a chilly experience because we've had more snow!  Not as heavy as last time, but cold and white nevertheless ... in fact, this little lady had to warm her posterior on the dining room radiator as soon as we finished with the camera in the garden
(and so did I!)


A cheeky warm-up!

I've just realised there are less than eight weeks until my first big show of the year ... so it's time for this bear maker to stop dollying around and start making bears for the Hugglets Winter Bearfest on the 28th February.  Get set go Paula!

Monday, 4 January 2010

Elephant steps ...

How pleased was I to receive the latest issue of 'Australian Bear Creations' magazine just before Christmas, only to discover my very first fully jointed elephant 'Delilah'  had been featured in the 'African Safari' article!  My first ever non-teddy bear design to be published! 


'Delilah' featured in Australian Bear Creations Vol 15 No 5

Delilah was my first attempt at a 16" ellie and I was so pleased with her when I finished her.  She found a lovely new home in the US last autumn and since then, you may recall I made 'Starlight', my second jointed elephant, created as part of my 'Magical Mayhem' 2009 collection.


'Starlight'

I have no idea if Starlight could be the kind of creation to catch the eye of a competition judge or two, but as we are now entering the international bear crafting competition season once more, I thought I'd offer this dear little elephant up for scrutiny in the 'friends' category ... so please, keep your fingers crossed for us!

LinkWithin

Related Posts Plugin for WordPress, Blogger...

Polite Request

Copyright: All Bear by Paula Carter 2019


I hope you enjoy sharing my blog and politely request that you do not copy either text or photographs without my permission.


Thank you.