COPYRIGHT: Please respect my copyright. My tutorials are provided for general interest only and are not offered for general distribution, copying, or sharing in any way, without my express permission.
The problems of wonky noses and uneven eyes can often be improved by going right back to basics and looking at how a bear's head is stitched together. This basic tutorial is for a classic three piece head design, but I think would be relevant for most head patterns.
First a word about the head gusset pattern piece: it must be symmetrical. My method for achieving a symmetrical head gusset pattern piece is simply to draw my pattern onto folded paper and cut it out, paper still folded, before transferring it to card.
For the purpose of this tutorial, I am assuming you have already stitched your two side head pieces (furry sides together) from sewn nose tip to neck opening and neatly clipped the seam diagonally at the nose tip to remove fabric bulk.
Secondly, an important thing to consider before marking the head gusset pattern piece onto your chosen fabric, is the weave of the backing fabric. If you look closely at the fabric backing you will see how the backing threads are woven together horizontally and vertically. Take particular note of the weft (horizontal threads) when placing your head gusset prior to marking out. Try not to be too swayed by the way the pile lays on the face of the fabric ... pile direction can be changed with a little post-head making styling if necessary. So, I recommend placing the nose tip carefully across the horizontal threads, ensuring it is level with the threads; this will help greatly when it comes to sewing your perfect nose! (That subject is another tutorial!)
Finally, a little tip: cut your head gusset slightly longer than needed at the back head end - all will become clear in a moment!
Okay, let's get started:
As with my footpads (see 'Perfect paw pads' tutorial) I like to mark out my sewing seam at the nose end of the head gusset. I do this prior to cutting out the fabric. If you wanted to, to ensure even seams and therefore a perfect shaped head, you could mark out your seam allowance around the entire head gusset.
WORD OF ADVICE: When marking your seam allowance on the reverse side of the fabric be careful with your choice of marker - I find a sharp lead pencil is best for this job because it won't bleed through the fabric into your bear's muzzle at a later date.
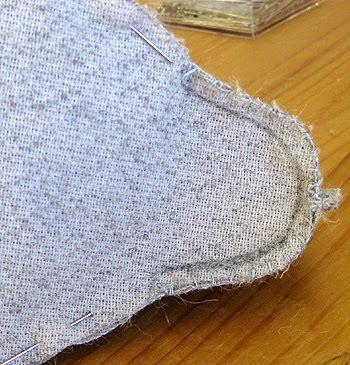
1. Fold the head gusset in half to find the centre of the nose area. Mark the centre with a dressmaker's pin, taking care to be exact, then take your side head pieces (chin seam already sewn) and pin straight through the very centre of the chin seam.


2. Following the line of your pre-drawn muzzle seam and using dressmakers' pins, secure the muzzle area in place by pinning vertically through the gusset into the relevant side head piece - take care to match your pins on opposite sides of the head gusset and around the muzzle area.
3. Because I prefer to leave most of my pins in whilst sewing the head gusset into place, at this point I pin the rest of the head gusset in place using small metal pins pinned horizontally (I think these are called household pins) - usually it's possible to sew past these little pins without damaging your machine needle.

TIP: If you have cut your head gusset longer than necessary, when you have finished pinning the leftover fabric at the neck (back) end of your head should be even, not lopsided ... if it's lopsided I'm sorry but you'll need to un-pin and start again because your head gusset fabric won't be distributed evenly and this will cause your bear's head to be mishapen when stuffed. If your leftover fabric is even - great! Simply snip across to remove the excess fabric.
4. Baste (oversew) around the muzzle area, removing dressmaker's pins as you go. Tip: You may find it helpful to secure the centre of the muzzle/chin together with a couple of firm stitches first - it may also help you to secure a small stitch at both of the muzzle indents, (the area before the shaping raise and curves to create the head/brow shaping) prior to basting around the rest of the muzzle.
5. Starting at the back of the neck, sew your gusset into place - I prefer to machine stitch for a neat finish. Take care to sew along your pre-drawn muzzle seam line, moving the machine foot very slowly around the curves.
TIP: I always machine stitch my seams twice for strength ... popping a seam when stuffing is no fun! Note: It's very important to ensure you achieve an equal seam allowance on both sides of the head if you want your head to be symmetrical when stuffed (this will help considerably when you come to positioning your bear's ears!)
6. Now you are ready to remove the little pins and turn your completed head furry side out to begin begin stuffing! First though, check you have eased all the seams out fully ... particularly in the muzzle area (if necessary, use a chopstick or similar blunt tool inside the head to gently ease out the corners paying particular attention to the nose area)- it's best not to rely on the stuffing to push the seams out for you.

7. Stuffing a bear's head can be tricky! For the purposes of this tutorial, I am using a non-slip polyester filler.
STUFFING TECHNIQUE: I prefer to start with the nose end and a smallish stuffing tool (I use the Barbara Willis doll makers' medium sized stuffing tool for this; please remember I'm a maker of big bears so I would say the tools I mention are especially suitable for bears over 10"... my BW stuffing tool comfortably stuffs a 20" bear head for example. The BW stuffing tool is strong and has a tiny head which really grabs the filler well to position it. I have found it much easier to use for head stuffing than my traditional bear stuffing tool ... but it does take a little more patience to fill a head! You will no doubt already have found suitable tools to accommodate the size of bear you are making, but if you'd like to try this BW stuffing tool for your very little bears, it is also available to purchase from www.joggles.com in a small size).
Taking small pieces of a firm, non-slippery polyester filler (something nice and 'crunchy' works well) and tugging at the filler to separate it so it doesn't 'ball', I ease it into the muzzle/nose area and when I have a few pieces in place, I give them a few firm prods with my stuffing tool to encourage them into place. Once the muzzle area is fairly well filled and reasonably firm, I add larger pieces of filler to the main head area ... I do this fairly symmetrically, so if I add filler to the left of the head, I will then add to the right side and so on ...
Once the filler is positioned moreorless around the wall of the head, I add filler to the centre of the head, pushing it into place with my fingers and then my stuffing stick until it feels firm but not like rock. During this process I am also continually encouraging more small pieces of stuffing into the muzzle area, checking my centre chin seam all the while I am working and 'moulding' the head from outside from time to time. I also run my hands over the seams on the outside of the bear's head frequently to make sure they are filled with filler and not lumpy. It's all a bit of an instinctive process, difficult to put into words, but if you think of yourself as a sculptor, rather than as a stuffer (!) and continually check your bear's head, holding it at eye level to ensure you are filling the cavity evenly and feeling your work from the outside, you should eventually achieve great shape.
TIP: If your stuffing feels overly hard and lumpy, don't keep stuffing in the hope things will improve, they rarely do! Remove and begin again, your bear's head is probably the most important element of your bear ... take your time to create a beauty!
There is a school of bear crafting thought that says bear heads should be rock hard - I'm afraid I disagree with this as I think they are better firm, rather than rock like ... it's personal preference of course, but my reasoning is that I prefer to work with my fabric, rather than battle against it and whilst generally strong, mohair was not designed to be impenetrable! A good quality mohair will cope well with firm stuffing, but may split with force. A firmly stuffed head allows scope for needlesculpting and will accept indented eyes, it will also provide a solid foundation for nose embroidery. A rock hard bear's head may prove an unnecessarily difficult challenge!
Once my bear's head is stuffed, I sit a hardboard disc and cotter pin joint in his neck cavity (I like to make my bears the traditional way with gathered neck and cotter pin joint) and run a couple of rows of running stitch around the base of the head to gather the base of the head together in preparation for assembling him later. There are several methods of closing your bear's head and as I say, this is just one of them. I then trim away a little of the fur from his nose area checking to ensure the chin seam is dead central, pin on his ears and use dressmaking pins to determine where I would like to place his eyes and nose embroidery.
Voila, he is now ready for muzzle trimming!
This is my bear below, with his head gusset sewn in, stuffing completed, dressmaking pins to denote eye placement (see 'tips' link below) for eye insertion tutorial), muzzle trimmed and nose/mouth sewn. (There is also a nose embroidery tutorial included in the link below)

FINAL TIP OF THE DAY: Try sewing your bear's nose before placing his eyes ... I think it makes it easier to tell if his eyes will be level.
If you would like to learn a little more about bear crafting, please visit my 'tips' page for further tutorials: http://allbear.blogspot.com/search/label/tips


