Saturday 31 March 2007

Head first.

Ever wish you'd started at the beginning? I've been in my sewing room, working on my new bear again this afternoon. I thought I'd share his progress with you after the nose pics suddenly inspired a sense of direction for my blog and after taking yet more photos on my trusty digicam today, it dawned on me that I hadn't shown you how to insert his eyes! So, my apologies for that ommission, but as I confessed in an earlier post, I do tend to have a bit of a butterfly mind on occasion. Maybe I'll flit back to eyes another time ...

Before we get started on fixing the head to the body, here's a pic of the tools I'll be using. I like to use two separate pairs of pliers for jointing, a round nose pair and a flat nose pair. The joints for this bear are traditional hardboard discs held in place with split pins and washers in the head and arms. I use nuts and bolts in the legs for extra strength. You can see a stuffing stick in the photograph, which is self explanatory, a tape measure and a thin headed chisel, which I use to make the holes in the hardboard discs slightly larger to accommodate heavy duty split pins and bolts. The phillips screwdriver and ratchet thingy are to tighten to nuts and bolts. I'll explain the wadding when we get to assembling the arms and legs.

Now, that's the boring bit done, so let's get to the good stuff ...

Head first!

Oops, just realised I forgot to include the awl in the tools photograph .. good job I'm not writing a book here!

This bear will have his head attached using a traditional method of jointing.

I use the pointy end of the awl to make a small hole in the centre seam of the bear's chest, about quarter of an inch from where it meets the back. This is where the bear's head will be inserted.


Here I'm inserting the split pin at the base of the bear's head into the hole I just made with the awl.


This bear is going to need a 2.5" hardboard disc to give his head the right amount of support. Here I'm slotting the disc over the split pin which is now poking through into the bear's body.


I've added a steel washer over the split pin to protect the disc before I use the round nose pliers to begin tightly curling one side of the pin.


I find the flat nosed pliers work best to finish curling the split pin securely.


Once it's curled tightly on one side of the pin. I repeat the process on the other. It's important to get this as tight as possible to hold the head steady for years to come.


And it really is as simple as that! Freddie's head is now securely attached to his body and he's waiting patiently for his arms and legs ...
Thursday 29 March 2007

Ahead by a nose!

The central heating boiler has been clanking rather alarmingly lately and I seem to have spent the entire day waiting while the world passed me by. Why is it, service engineers and delivery companies never give specific times?

Anyway, in the end, I settled down to sewing the nose I told you about yesterday and yes, I did remember to take photos as I worked so now you can see my new bear start to come to life!


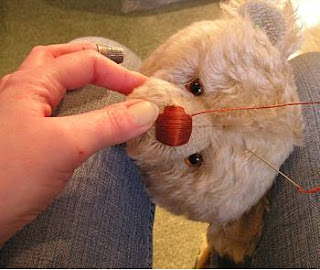
I know it looks painful, but the long needle is an essential part of the process. I like to work with the head gripped between my knees, I don't know how other bear makers sew their noses, but this position works for me.
I use a traditional block design for nose embroidery and prefer to work straight onto the mohair without a template. This bear's nose is going to be a lovely rusty colour. Starting in the centre of the muzzle, I work first out to the left of the bear's nose in satin stitch, watching carefully where my needle is exiting each time, so that all the stitches are neatly aligned. There is a knack to sewing a good nose and it relies heavily on tensioning the thread equally for each stitch and ensuring all the stitches are the same length.


When I've finished the left side, I return my needle to the centre and repeat the process for the right side of the nose. This gives me a base layer of embroidery to work over. I can now see what size of finished nose will suit my bear before I complete my embroidery. By the way, a good stout thimble is essential to protect the end of your finger when stitching!

As you can see, his nose is beginning to take shape, but at this point, it's not really doing him justice. There's more work to be done if he's to have a nose to be proud of!

So, the next step will be to repeat the process, but this time, ensuring the finished nose is exactly the right size and shape to suit my bear.

Here we go again! Back into the centre of the muzzle, out to the left first, then to the right. This time my stitching exits slightly higher on the muzzle so that the nose will be the final size necessary to give him that all important bearsonality!

Can you see it taking shape now? I use my thumb to tension each stitch as I sew, so this is far from a speedy process, but definitely worth taking a little time and care over.

If I add a couple of finishing stitches horizontally across the top and bottom of the nose and we're almost there...


Two little stitches down the centre seam of the muzzle and this fella is all ready for his mouth to be stitched in a traditional inverted 'V' shape ...


And voila! Here he is!
Hey, hello Freddie ... he looks like a Freddie to me, does he to you?

So my new bear's head is now made and you've been the first to meet him, but he needs a body, arms and legs before he really comes to life and of course, please don't let me forget to sew his ears on ...


Wednesday 28 March 2007

The Guided Tour

I wasn't sure what you'd like to hear about today, so I grabbed my little digicam and disappeared up to my workroom. I've been a fidget all day, unable to settle to any single job. Do you have days like that? 'Butterfly mind', I've heard it called. It certainly applies to me ... I'll start on one thing, then something will flutter across my train of thought and before I know it, I'm somewhere else, thinking about something else ... er, so where was I? Ah yes, my workroom. Let's take a guided tour. I'm going to start with a picture of my newest organiser, isn't it lovely? Okay, so maybe you can't see what I'm seeing, so let me explain ... this thing came in pieces, the instructions were in German, I'm a girl ... aha! Now you get the picture?! Yes, in my eyes, this was a major operation in concentration and screwdriving skills. I was determined not to call for male assistance, so I battled on until bingo, it was built and fully operational! A small achievement by most standards I'm sure, but a point to be proved in my overtly female head nonetheless! I'm very pleased with my handiwork and best of all, I no longer need to fight the tangle of cotton in my workbox every time I need a new reel to work with!
I'm working on a new style of traditional bear at the moment. Remember Charlotte, the bear in the knitted dress I introduced you to at the opening of my blog? She's the first of my 'Timeless Teds' collection. I thought she needed a brother bear so I've been working on his head this week. Don't worry, the rest of him will follow shortly! I'm pleased with this design because I seem to have developed a style which leans towards more contemporary bears in the main, but this new design strikes me as hitting a plausibly traditional note at last! It must be something to do with the mohair I'm using and the shape of the head with the centre seam ... sorry, I'm waffling now, would you like a closer look at the head? I'll pop one in here for you to take a look at:

He has traditional amber and black glass eyes - I think there's something very appealing about the expression they give a bear. I actually think it's harder to build expressive personality into a traditional bear, than it is a contemporary bear. After all, there are no tricks of the trade one can draw on, no shading, no embellishment! It's all down to traditional bear-making skills and that is the beauty of it. I will stitch his nose tomorrow and if you'd like me to perhaps I'll take some pictures so you can follow his progress with me.

See how I've flitted off subject again? It's definitely one of those days. So, where was I? Ah yes, the workroom. This is 'Charlotte', sitting patiently on my shelf waiting to be adopted by her special someone. The books on the shelf above are some of my childhood favourites, 'Winnie the pooh', 'Just so stories', 'Peter Pan', 'Jane Eyre' ... that one was my mum's ... there are some things you just don't let go.


Naturally, just out of shot there is a tv, a dvd and a video player, after all, a bear-maker's life is one of isolation and would be hard to cope with were it not for a few simple pleasures. When the tv fails to inspire me, I like to indulge myself with loud music. Today Christina Aguilera has had her turn, my daughter bought me her latest CD for Mother's Day and tucked it inside a pretty gift bag filled with sparkles and love. I have two great kids by the way ... how lucky can a mum be.

Tuesday 27 March 2007

If the sun shines ...

So my intro is dealt with and now I need to work out where this blog is meant to take us. I don't have a plan, which means that as is very usual in Paula's world, there will like as not, be no sense of direction, no pre-navigated route.
Take today for example, without doubt I'll work on instinct, go with the flow, follow my heart. Does that mean I'll have a satisfyingly creative, organised day meeting scheduled targets? Who knows? If the sun shines then yes, if it clouds and greys, it may be doubtful. I believe the sun's energy is very positive, so I've sited my workspaces accordingly, to ensure I'm drawn to areas of bright daylight to work. Daft eh?

I'm going to paint my sewing room soon. It's chilly hospital blue and I'd like energising warmth, so I've splashed a couple of yellow splodges on the wall to see which one inspires me. I don't think I've found the exact shade to work for me yet, so I will be adding further sunshine splats to my wall in the next day or two!

I'm dreaming of a cheerful, orderly workroom, but as you can see, it's far from that at the moment. It's only been seven and a half weeks since I took the plunge and moved into this house, so I guess there's still plenty of time ahead for dreams to be fulfilled ...

Hook, line and sinker.

They must be a tough call for any bear, teenage years. My bear stuck around loyally whilst being hauled along by his ear, through to the humiliation of becoming my teen mascot. He suffered the indignity of rosettes, tartan scarves and even stripey socks from time to time, while I obsessed about the Bay City Rollers. Fortunately, it was a brief obsession, tossed carelessly aside as I entered my hormonely fraught teenage years, by which time of course, teddy bears had also been cast aside temporarily, in favour of more intriguing, albeit slightly less hairy, boys.

Which reminds me, my poor father! Teenage obsessions and five, yes FIVE, daughters. For him, they must have been dark days indeed. I do remember he worked long hours ...

We were a handful through our teenage years, there's no doubt about it and if you ask my Dad, I'm sure he'd tell you we still are. At forty four I'm the oldest and my baby sister Laura is eleven years younger. Between us we've produced nine grandchildren for our parents, eight of whom are, would you believe it, girls!
So what does all this have to do with my bear-making? I'm not really sure. I do know that my bear was the key to it all though. I came across a picture of a bear just like him in a bookshop one lunchtime, years ago. It caught my attention and drew me to the credits at the back of the book where there was a teddy bear museum listed. It was within travelling distance, so I couldn't resist planning a visit and once there, I didn't want to leave. I loved those old bears sat patiently in their glass cabinets, they looked like they had so many tales which might never be told and they captured me, hook, line and sinker. From there, it didn't take me long to stumble into the amazing world of artist designed bears and of course, I had to dabble, didn't I?

Monday 26 March 2007

... and that was how it all began.


He sits on the floor by my bedside these days, my old bear that is. I'll make no excuses, after all, there are none to be made. He'll stay with me until the day either one of us disintegrates into a pile of dust; sometimes that's just the way life is ... don't you think?
Big Ted came into my life on the grand occasion of my first birthday. It was apparent even then, that he was a bear not to be messed with, a bear of significant bearing in fact. He was purchased by my parents while we lived in Africa, and by the age of eighteen months, I had only just grown as tall as my new guardian ... cute kid eh?

Naturally, I'm much older and considerably taller now, and the bear? Well, to say the least, this is one bear with a great deal to answer for ...


Are you sitting comfortably?


Then I'll begin ... although, to be honest, I'm not quite sure where to start! So, how would you feel if I just let my fingers do the walking and we'll see where they take us?

Do you like the teddy bear? That's a relief! She's my latest creation. Yes, I'm a teddy bear designer, does that surprise you? If you recognised the quote by AA Milne, probably not. My guess is there may be an elderly bear sitting quietly on your pillow, or a little more discreetly at the foot of your bed. You've had him for years and years, he's a wee bit threadbare these days, maybe missing an ear, or an eye, but there's something about him, something very special ...


LinkWithin

Related Posts Plugin for WordPress, Blogger...

Polite Request

Copyright: All Bear by Paula Carter 2019


I hope you enjoy sharing my blog and politely request that you do not copy either text or photographs without my permission.


Thank you.